
Raspberry Pi home server project
Published:
What you’ll need:
A Raspberry Pi computer. Though I used a Raspberry Pi 3B+, I’d recommend using a Raspberry Pi 4B. The 3B+ model only has USB 2.0 ports whereas the 4B model has USB 3.0 ports that offer faster data transfer.
A good power supply. Don’t skimp on this, especially if you attach two hard disks for redundancy. I had multiple instances of the server crashing due to low voltage from the power supply until I plugged it into a power source that pumps out 2.4 A at 5V DC. Vendors typically sell the recommended power source that is rated for 2.5 A at 5V DC. The 4B model uses a USB-C port for power input and also has a recommended power source (sold separately).
An external hard disk/USB drive. You could use a hard disk lying around, but be aware that we will be formatting the drive, so make sure you keep a safe copy of all the files in it before following the procedures outlined here. We’ll be setting up the server so as to store all the files in this hard disk, so make sure the hard disk has sufficient storage capacity.
A microSD card, ideally larger than 16 GB. You could store all the data that you want to backup on the microSD card itself, but the largest microSD card that has been tested to work is 128 GB so you can expect to get a storage capacity of about 110 GB. I had a spare hard disk lying around, so I setup the server to use the hard disk to store the data. The instructions in this post are for servers that use a hard disk connected to the Raspberry Pi through the USB port.
A microSD card reader. Some laptops come with an SD card port, so you could fit the microSD card into the SD card adapter and insert it into the appropriate port of the laptop. My laptop doesn’t, so I bought this memory card reader to flash the operating system of the Raspberry Pi on to the microSD card.
A monitor/TV, keyboard and mouse (optional). You could setup the server without ever connecting it to a monitor/TV, keyboard and mouse by logging in to the Raspberry Pi wirelessly using ‘ssh’, but this requires you to be comfortable with executing commands in the terminal.
A case for the Raspberry Pi (optional) for a clean-looking end product.
Procedure to set up the wireless file server
Flash the operating system on to the microSD card
Insert the microSD card into the SD card adapter and insert it into the SD card port on your laptop. If your laptop doesn’t have the SD card port (like my MacBook Pro), insert the microSD card into a microSD card reader and plug in the card reader to your laptop. We’ll use the Raspberry Pi imager software provided by the Raspberry Pi foundation for flashing the OS on to the microSD card. Install the Raspberry Pi imager software to your laptop. Once successfully installed, click on the icon for the software and you’d be greeted with the following screen:
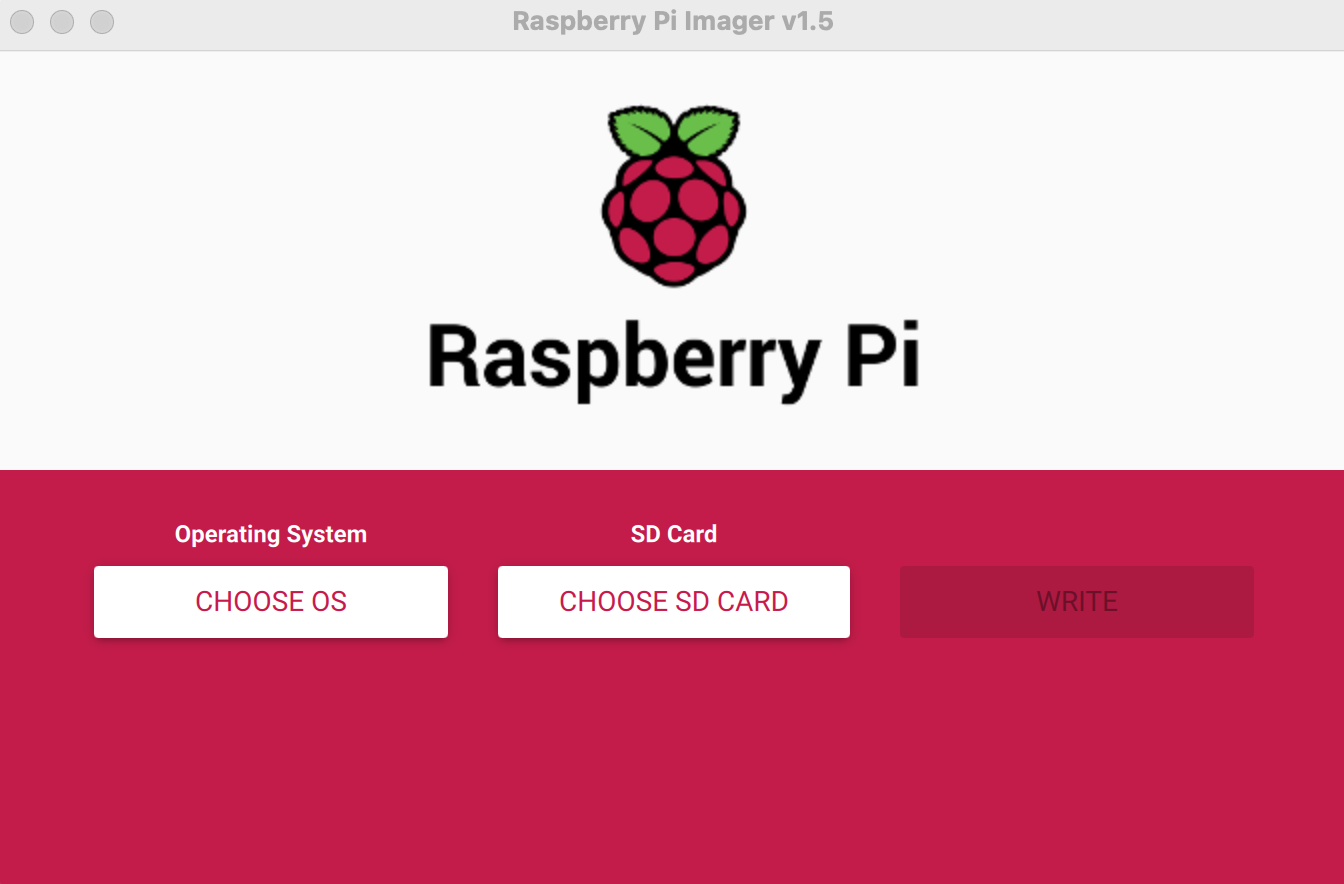
I chose to install the Raspberry Pi OS Lite (32-bit); this OS is pretty lightweight but does not come with a graphical user interface as we’d be running all the commands on the terminal anyway. Alternatively, you could choose to install the Raspberry Pi OS full, which comes with a full-fledged desktop environment which would be more comfortable for those who are unfamiliar with the linux environment. A few more clicks and you would be done! This video shows you how to use the software. Do not remove the microSD card when the Raspberry Pi imager software is flashing the OS on to the microSD card!
Enable networking on the Raspberry Pi
Remove and reinsert the SD card reader to your laptop once the OS has been successfully flashed on to the microSD card. The SD card should show up with the name boot. Open File Explorer (if using Windows) or Finder (if using MacOS) and navigate to the drive/volume named boot. Create an empty file named ssh in the boot drive/volume. The reason for doing this step is to ensure that we can login to the Raspberry Pi remotely and setup the server in a ‘headless’ mode i.e. without plugging in a keyboard, mouse and monitor/TV. SSH stands for secure shell. You can read more about it here. Alternatively, open terminal (on MacOS) and type the command:
touch /Volumes/boot/ssh
The next step is to tell the Raspberry Pi to connect to your home wifi. In the boot drive, create a file named wpa_supplicant.conf and enter the following text in the file:
country=US
ctrl_interface=DIR=/var/run/wpa_supplicant GROUP=netdev
update_config=1

network={
    ssid="Network_name"
    scan_ssid=1
    psk="password"
    key_mgmt=WPA-PSK
}
Replace the “Network_name” with the name (case-sensitive) of the wifi network you want the Raspberry Pi to connect to, and replace “password” with the password of that wifi network. If you are using a Windows computer to set this up, change the file type to All Files (*.*) and use .conf for the file extension when saving the file. Safely eject the SD card reader.
Boot and connect to the Raspberry Pi
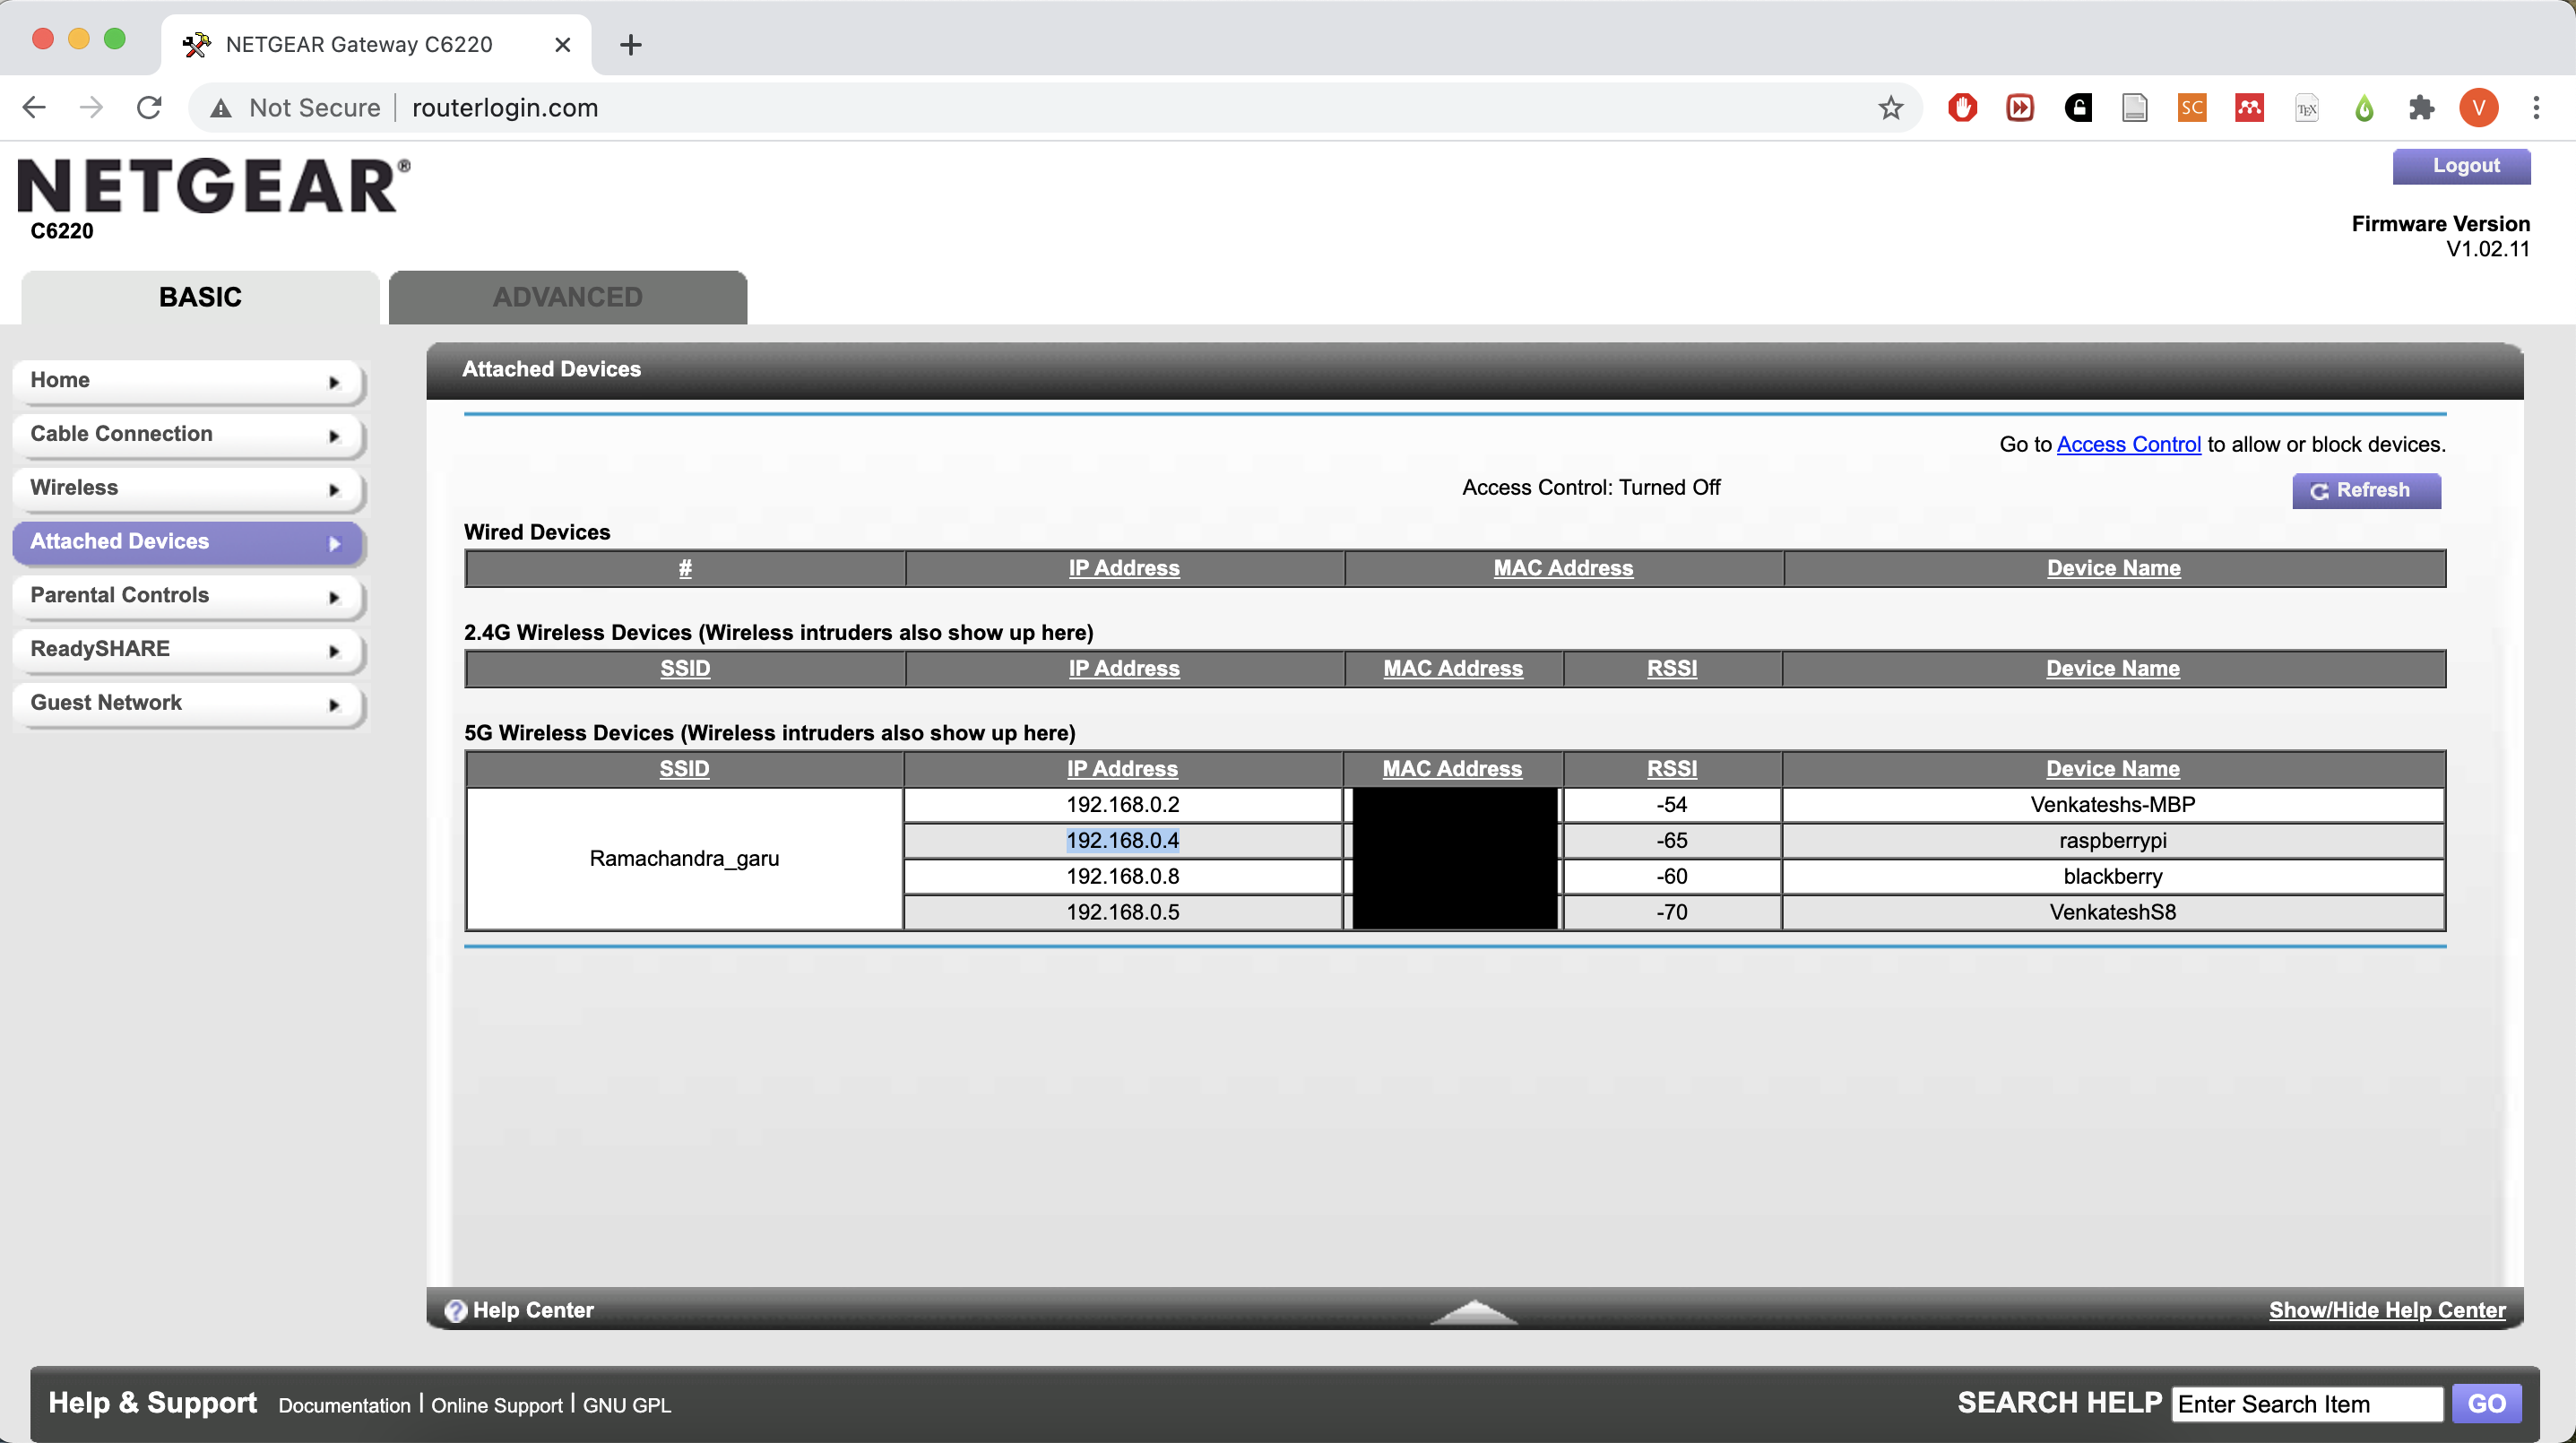
Insert the microSD card into the card slot in the Raspberry Pi. You could optionally hook up the Pi to a monitor/TV, keyboard and mouse. Plug in the power source after connecting the monitor/TV, keyboard and mouse. When the Pi boots, it uses the information we’ve entered in the wpa_supplicant.conf file to search for and connect to the wifi network automatically. It looks for the ssh file in the boot directory (which we created in the previous step) and enables us to login to the Pi using ssh. The next step is to find the Pi’s IP address so that we can login and set up the Pi in the headless mode. One way to find the Pi’s IP address is to hook up the Pi to a monitor and keyboard. Login with the username pi and password raspberry and type ifconfig. Another way to find this is to login to your wireless router’s configuration page. Open your favorite web browser and enter 192.168.1.1 in the address bar. Some routers (such as my Netgear router) may use some other address such as routerlogin.com. Enter the admin and password (if you don’t remember it, check the instruction manual for the router or the sticker at the back/bottom panel of the router). Note down the IP address corresponding to the device name raspberrypi. My router’s configuration page looks like this:
Now that you have your Pi’s IP address, login to the pi by firing up the terminal and entering the following command:
ssh pi@192.168.0.4
Replace the 192.168.0.4 with the IP address of your Pi. Type yes to the prompt and enter raspberry for the password. You should now be logged in to your Pi. In case you are using a Windows computer, you could install the Ubuntu subsystem and enable the Windows Subsystem for Linux as explained here, or install putty.
Configure the Raspberry Pi
It is of utmost importance to change the default password to something else so as to prevent unauthorized access to your Pi. To do so, having logged in to the Pi, type the following command and respond to the prompts accordingly:
passwd
You can further customize the configuration of your Raspberry Pi using the Raspberry Pi Software Configuration Tool. To use the tool, type the following comamnd in the terminal (you must be logged in to the Pi using ssh to do this):
sudo raspi-config
This opens the tool. You can navigate using the arrow keys and use the enter key to make selections. For example, to change the hostname, select 1. System Options, then navigate to S4. Hostname to change the name of the Raspberry Pi from the default raspberrypi to something else. I changed mine to blackberrypi ;). Next, navigate to Advanced Options and choose Expand Filesystem to ensure that all the storage capacity of the SD card is available for use. Once you are done customizing your Pi, select Finish. Reboot when prompted. The connection to the Pi would be shown to be terminated. Wait for a few minutes for the Pi to reboot.
Some useful commands
When operating the Pi remotely, it is useful to know the commands to update, shutdown or restart the Pi remotely. To restart, use the command reboot. To shut down, use the command shutdown -h now. If that fails, you may use sudo shutdown -h now. You could also use systemctl poweroff. You could even schedule the shutdown to be triggered at a specific time; for example, shutdown -h 01:35 shuts down the Pi at 1:35 AM. To update all the installed packages at once, use the command sudo apt-get update followed by sudo apt-get upgrade.
Add external hard disk/SSD/storage
Use the command from above to shut down the Pi. Wait for a few seconds. Plug in the external hard disk/SSD/USB drive into the USB 3.0 port (if using the model 4B) or the USB 2.0 port (all other models) and reconnect the Pi to the power source. Before proceeding with the subsequent steps, ensure that you have copied all the data from the external hard disk to your laptop or some other storage media. We will be formatting the external hard disk; therefore, you’ll lose all the pre-existing data on it. Login to the Raspberry Pi from the terminal using ssh.